
Pausing a Moment
When I use Camtasia for work, I usually visit the TechSmith Support for a quick solution. After I learned that TechSmith had an instructional video guide, I read Danielle Ezelle’s The Ultimate Guide to Easily Make Instructional Videos. Initially I agreed with Ezelle’s statements because they correlated with R. C. Clark and R.E. Mayer’s, E-learning and the science of instruction: proven guidelines for consumers and designers of multimedia learning.
| Danielle Ezelle | R. C. Clark and R.E. Mayer |
| Tutorials are videos that show step by step instructions. | Transformational graphics show how an object changes over time. |
| Content creators can feel overwhelmed or obsessed with the need to make perfect videos. | Minimize extraneous processing, do not add decorative text or images. Stick to representational graphics that are relevant for instruction. |
| Keep videos short. | Avoid cognitive overload. Chunk out lessons. |
However, I think that Ezelle’s steps for creating an instructional video is impractical for creating software tutorials. If you provide software training and support, then you will, at some point, create new training material before you are fully comfortable with a program. When time is short, creating a tutorial handout can benefit your learners and you.
Creating Content
Storyboards show one sequence at a time with a panel for text, audio, and an image, or like the example below, provide step-by-step instructions by row. Even though I work with an eLearning student assistant, breaking down the narration and the edit notes takes so long that that we never add screenshots.
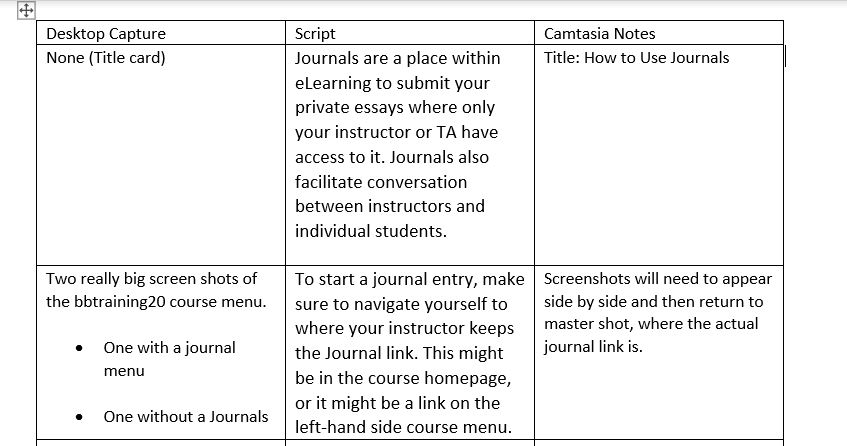
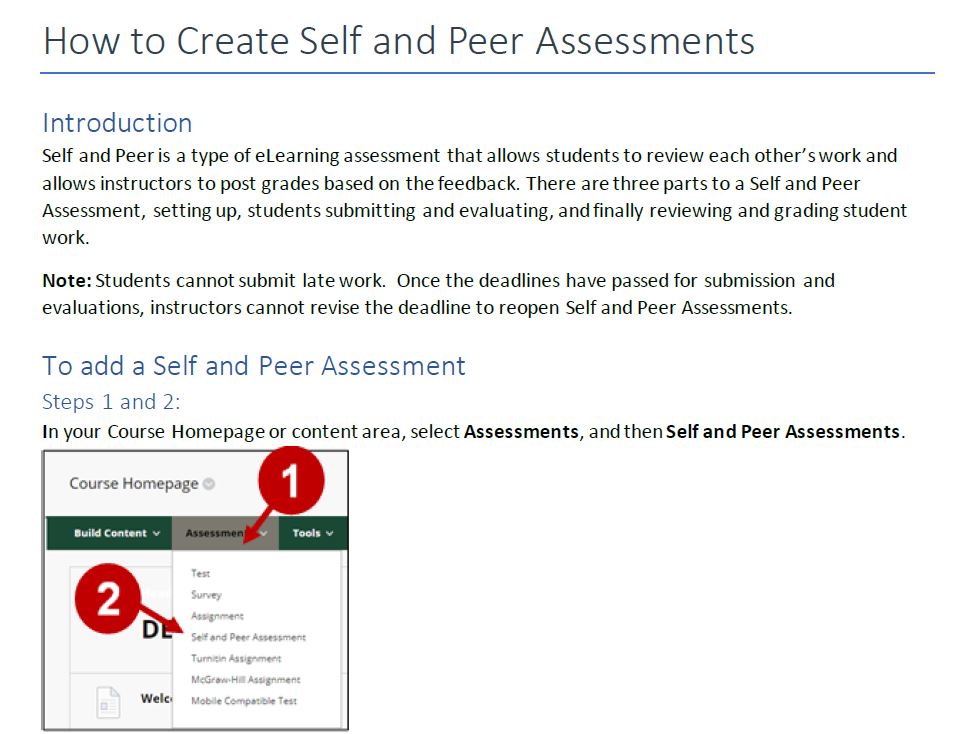
Screen capture of a typical storyboard at workFor the same amount of time and effort the student worker or I can create a handout that provides an introduction, match screenshots with narration, and add any visual cues to clarify a series of steps. Below is a handout that was used for a two-part tutorial. We used most of the text as a script and just used rectangles instead of arrows as visual cues.
Creating a handout can also provide trainers a chance to practice and memorize software commands before recording a video. Clark and Mayer identify three steps that a trainer would follow.
- Selecting words and images – Prime for learning by capturing images that illustrate the official documentation or software notes.
- Organizing words and images – Arrange text and images into a sequence that engages working memory.
- Integrating – Publish the tutorial and provide training for others.
After I complete a handout, I either practice for a training session or a video.
Wrapping Up
Although I am skeptical about storyboards for software videos, I agree with Ezelle’s recommendation to practice and prepare for a recording. Because I create a handout, my production is different, but it can be outlined in seven steps.
| Danielle Ezelle’s Steps | My Steps |
| Step 1: Determine and get to know your audience | Step 1: Receive documentation or notes |
| Step 2: Write a storyboard and script | Step 2: Create handout |
| Step 3: Record your narration | Step 3: Identify audience |
| Step 4: Record your screen or capture video | Step 4: If needed, create script from handout. Practice. |
| Step 5: Edit the video | Step 5: Record audio and video |
| Step 6: Add a video intro | Step 6: Edit, add intro and outro |
| Step 7: Share your video | Step 7: Share my video |
My work does not require me to provide other types of videos, but I look forward to creating seeing if creating other videos make me reconsider storyboards.

Leave a reply to jwisdom08 Cancel reply